


|
Navigation: 3D-PDF Export with templates |
Scroll
 | |
|

With 3DViewStation you can export your model as 3D-PDF and optionally embed 2D templates. 2D templates can be displayed directly without having to load the much more complex 3D model information. Thus, the template can be used to quickly retrieve important information. If required, you can switch to the 3D model view by double-clicking on the template. Some KISTERS demo templates are available for this purpose, which can be adapted to your needs. This chapter explains how to use and customize PDF templates or create your own ones.
The 3D PDF export can be found in the START > FILE > SAVE AS tab. The settings to be used, for example to select a template, can be found in SETTINGS > Default > EXPORT > PDF.
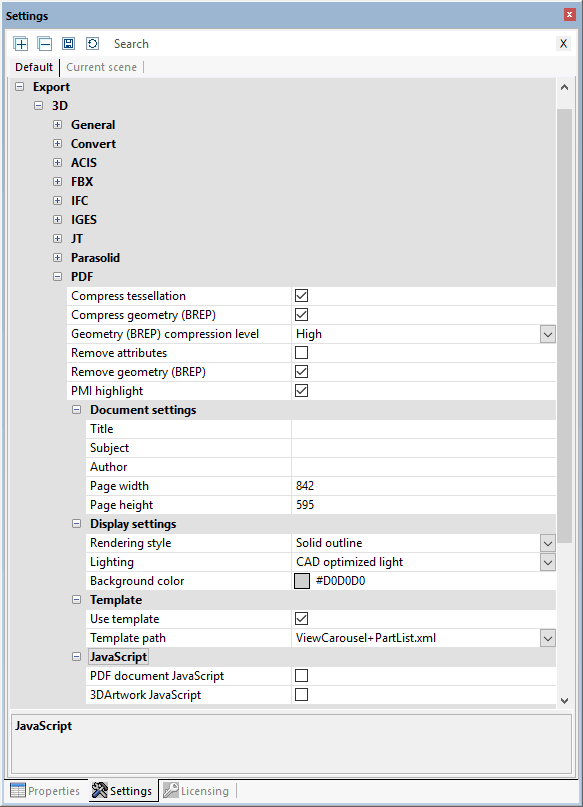
If the Settings pane is not visible to you, you can display it again via View > Show panes > Settings.
To use 3D PDF templates, activate the Use template check box under Default > EXPORT > 3D > PDF > Template.
You can then select one of the KISTERS demo templates. These templates demonstrates some of the possibilities offered by templates. For example, the template ViewCarousel+PartList+Logo.xml shows a parts list, the views (if available) as a view carousel in the lower template area and the KISTERS logo. ViewCarousel+PartList+ActionButton.xml simple integration of JavaScript into a template.
Customizing and creating 3D templates
A template consists of at least two components:
▪The Adobe form (*.pdf): The layout is defined here, e.g. where the field for the date should be, as well as various design elements.
▪The XML description (*.xml): This file defines the relationship between the content, e.g. the current date, and the field in the form.
▪Further components such as images (logos) and JavaScript are possible.
A template can be created in three steps:
1.First a design with all static elements like background color, lines, fixed texts etc. is created and exported as PDF.
2.The PDF created is then converted with Adobe Acrobat Pro into a form that contains the fields to be filled.
3.Finally, the referencing of contents to the fields of the form is created via an XML file.
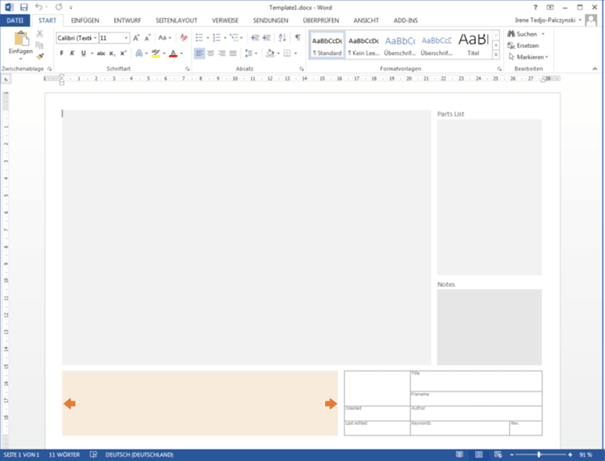
1. Creating a design
Create your desired design with static elements such as background color, frames, fixed texts, etc. and export the finished design as PDF. This can be implemented with Microsoft PowerPoint or Word, for example. The file name corresponds to the template name later displayed in the KISTERS 3DViewStation.
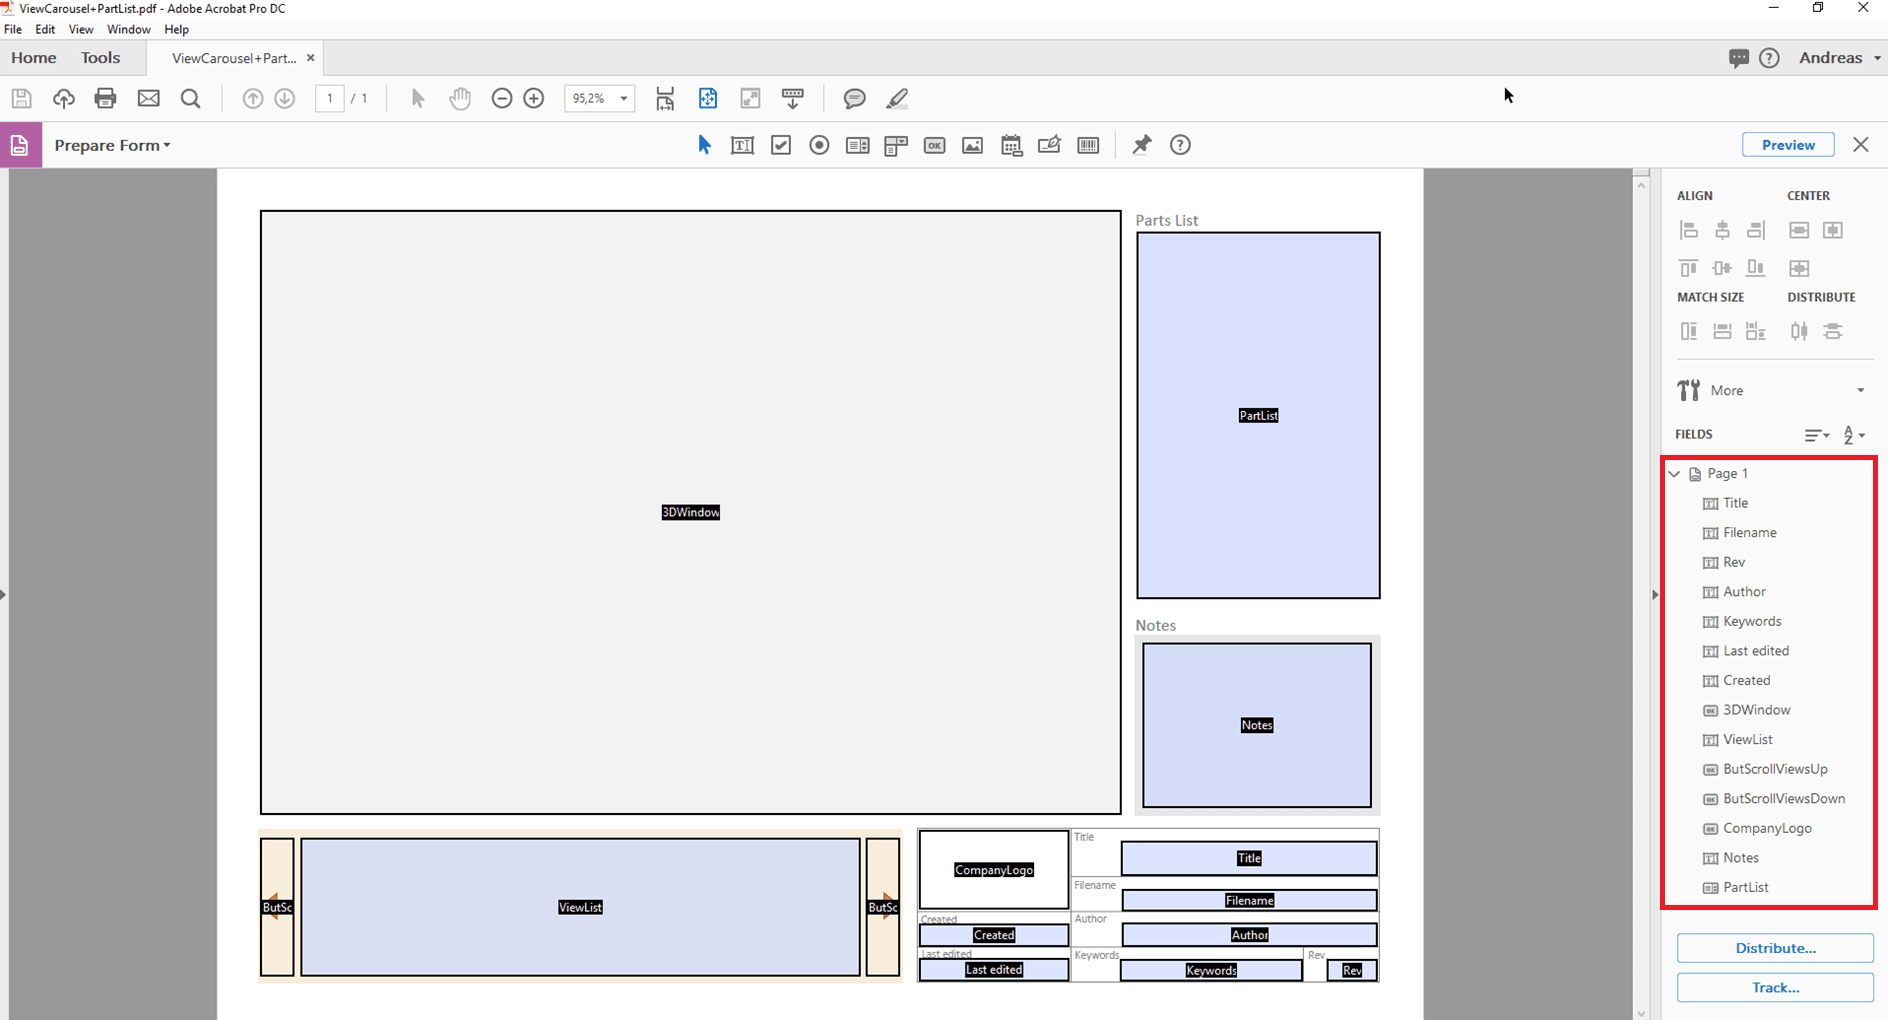
2. Creating a form with Adobe Acrobat Pro
▪Open the previously created PDF file with Adobe Acrobat Pro, select the Prepare Form option on the TOOLS tab, and click START on the displayed page.
▪Adobe Acrobat Pro now tries to detect fields automatically, e.g. text fields and tables with frames are detected. On this basis, recognized fields can now be edited and any various fields can be added. Corresponding field types should be selected for the various information that is transferred to the fields when exporting from the KISTERS 3DViewStation, such as a preview of the model, views, date, etc. Often, different field types are available for an information. Which one to use depends on the desired behavior. For more information about the required fields, see the Available Design Elements section below. To check the type of a field, open the properties by right-clicking on a field. You can read the type from the title bar of the properties.
You can find further information about creating forms with Adobe Acrobat Pro on the manufacturer's website.
▪The name of a field is used to assign content. Therefore, it makes sense to choose unique names that correspond to the type of content. We recommend to not use special characters, umlauts and spaces.
▪Once all fields have been defined, please save your changes.
3. Referencing of fields with content using XML description
An XML description is used to display hierarchically structured data in the format of a text file. An editor can be used for editing, Notepad++ offers useful convenience functions.
Create a text file, e.g. by right-clicking on your desktop, in the context menu that appears select NEW and TEXT DOCUMENT. The file name should correspond to the name of the previously created PDF file. Replace the txt file extension by xml.
You have created two files so far: TemplateName.pdf and TemplateName.xml.
For further editing of the XML file you can use one of our examples for comparison. These can be found in the installation directory > Resources > Templates > PDF.
Each XML element has an opening and a closing tag (recognizable by the "/"). Tags can contain additional parameters. Between the opening and closing entry there can be further XML entries.
First, the XML structure for a template is opened using <PDFTemplate>, but two parameters are also contained here. Type="Form” specifies that the template is created with an Adobe form. PDFFile="TemplateName.pdf" defines the form to be used. Enter the name of your previously created PDF form here. The XML structure is closed with </PDFTemplate>.You get the following structure:
<PDFTemplate Type="Form" PDFFile="Template name.pdf">
MORE XML CODE
</PDFTemplate>
In the middle section, you can now enter additional XML code for assigning the previously defined form fields. To reference the field where the preview or 3D model is to be displayed, add the following entry:
<PDFFormField Name=”YourFieldName3DModell" Type="3DWindow"/>
Replace the entry YourFieldName3DModel with the name you entered for the desired field. The "Type" is defined and can be taken from the table below.
You get the following structure:
<PDFTemplate Type="Form" PDFFile="Template name.pdf">
<PDFFormField Name=”YourFieldName3DModell" Type="3DWindow"/>
</PDFTemplate>
Text fields can contain static and variable content. In this example, the file name of the exported model is passed to the Name=”Filename" field with <Line Text="%file"/>. You get the following structure:
<PDFTemplate Type="Form" PDFFile="Template name.pdf">
<PDFFormField Name=”YourFieldName3DModell" Type="3DWindow"/>
<PDFFormField Name="Filename" Type="Text">
<Content>
<Line Text="%file"/>
</Content>
</PDFFormField>
</PDFTemplate>
Now add more lines for all required fields and store all files (PDF, XML, JavaScript and graphics) in one of the two PDF template folders:
▪Installation directory\Resources\Templates\PDF
▪%USERNAME%\Documents\Kisters\ViewStation\Templates\PDF
Your template will be available in the KISTERS 3DViewStation at the next start. The PDF template list is created as a common list from both folders.
3D model
Adobe form field type: |
Button |
XML type: |
3DWindow |
XML example: |
<PDFFormField Name="IhrFeldname3DModell" Type="3DWindow"/> |
Description: |
For the area in which the preview of the model or, if activated, the 3D model is rendered, the form field BUTTON is recommended. |
Images/Logos
Adobe form field type: |
Image field |
XML type: |
Image |
XML example: |
<PDFFormField Name="CompanyLogo" Type="Image" File="Logo.png"/> |
Description: |
For embedding graphics. |
Text
Adobe form field type: |
Text field |
XML type: |
Text |
XML example: |
<PDFFormField Name="IhrFeldname3DModell" Type="3DWindow"/> |
Description: |
In addition to static text, dynamic text can also be passed to a text field using the following variables. %user = Username %file = File name %date = Current date %time = Current time |
Carousel view
Adobe form field type: |
Text field and button |
XML type: |
ViewList |
XML example: |
<PDFFormField Name="ViewList" Type="ViewList"/> |
Description: |
The carousel view consists of three individual elements: ▪The text field that displays three thumbnails horizontally. ▪The [Back] button. Form name: ButScrollViewsUP ▪The [Next] button. Form name: ButScrollViewsDOWN |
Bill of material
Adobe form field type: |
Selection list |
XML type: |
PartList |
XML example: |
<PDFFormField Name="PartList" Type="PartList"/> |
Description: |
Scrollable bill of material of all parts. The parts can be selected via the bill of material. |
JavaScript
Adobe form field type: |
Button |
XML type: |
MyActionButton |
XML example: |
|
Description: |
For more information, please read the section "Embedding JavaScript in 3D PDF". |
In order to extend the functionality of the 3D PDF templates, JavaScript can be embedded. Three variants are available. The JavaScript file is placed in the above-mentioned user or installation directory of the template (like other dependencies too). You will also find the following three examples in the installation directory:
▪Execute JavaScript when opening the 3D PDF (e.g.: JavaScriptDocument.js).
▪Execute JavaScript when activating the 3D scene (e.g.: JavaScript3DArtwork.js).
▪Execute JavaScript by activating an inserted button (see MyActionButton above) (e.g.: JavaScriptButton.js).